Search This Blog

Wednesday, December 29, 2010

Christmas Cookies

Here is an array of my Christmas Cookies.  Whew am I glad that's all over.

there are pecan snowball, ginger crinkle, lemon shortbread. pistachio, blueberry, shortbread, walnut sandie, sesame walnut, poppy seed orange, ultimate peanutbutter and the squares are a banana, date, cranberry muffin.  The chocolate raspberry ones were not done when I took this picture.

this is the chocolate cookie with the chocolate raspberry ganache in the middle. (I put a walnut on the top of this one)


This is the linzer, blueberry and walnut sandie on the right.


this is the lemon shortbread, and the left is the pecan snowball.


The ginger crinkle.


center pistachio cookie


apricot linzer cookie


ultimate peanut butter...yummy


So there you go, if there are any you would like the recipe for let me know.  Hope you all are recovering from Christmas.  Hard to believe in 2 1/2 days it will be a New Year.
Thanks for stopping by and Remember to Find the Time to Do ALL the things YOU love.

Donna

Friday, December 24, 2010

Merry Christmas

I hope everyone has a wonderful Holiday Season filled with love, good health and many blessings.  I also want to thank all those that stop by and visit my blog.
Hugs,
Donna

Monday, December 20, 2010

Candied fruit

 The holiday is quickly approaching and I'm still baking away.  This past week I tried making candied fruit.  My first project was candied orange peel, boy are they yummy and very easy to make.  You can make candied lemon peel or grapefruit also.
It's a little time consuming because it's done in 4 steps. 
Cut tops and bottoms off of the orange and score the orange into quarters, cutting down only into the peel and not into the fruit. Peel the skin and pith of the orange in large pieces, use the orange for another recipe. Cut the peel into strips about 1/4-inch wide. Put the orange peel in a large saucepan with cold water to cover, bring to a boil over high heat. Then pour off the water. Repeat 1 or 2 more times depending up how assertive you want the orange peels to be. I did it 3 times because they say that mellows the bitterness (true) But you could do it only 2 times if you want.  Remove the orange peels from the pan.
Whisk the sugar with 1 1/2 cups water. Bring to a simmer and cook for 8 to 9 minutes (If you took the sugar's temperature with a candy thermometer it would be at the soft thread stage, 230 to 234 degrees F.) Add the peels and simmer gently, reducing heat to retain a simmer. Cook until the peels get translucent, about 45 minutes. Resist the urge to stir the peels or you may introduce sugar crystals into the syrup. If necessary, swirl the pan to move the peels around. Drain the peels, (save the syrup for ice tea.) Roll the peels in sugar and dry on a rack, for 4 to 5 hours. Return to the sugar to store.
The other candied fruit I made was lemon and pineapple.  Some of the after it was candied I chopped and added fondant so I would have center for chocolate candy (which I made and those are so yummy too, like a cherry cordial but only pineapple instead)

 This fruit is a lot sweeter and I think if I make it again I will cut down on the honey, it's has a very strong honey flavor when eaten alone, but in the candy I think the fondant mellows the flavor.  I also took several of the pieces and just covered them in chocolate.

Prepare fruit.
Cut pineapple, apricots and watermelon rind into small pieces; chop cherries in half; remove white pith from lemon, orange or grapefruit peel and cut into strips or small pieces.
 Combine 1 cup sugar, 1 cup honey and 1-1/2 cups water in heavy saucepan.
 boil over medium heat and cook, stirring constantly, until mixture reaches 235 degrees F on candy thermometer.
Drop small amount of fruit into liquid.
Cook on low heat 20-30 minutes until the fruit or rind is transparent.
 Drain and repeat with rest of fruit.
Cool fruit and store in airtight container.
Next I will be posting some of the Christmas cookies I've made, that will probably be mid week.  Also I'll post my chocolate candies.
Have a wonderful day and Remember to Find the Time to Do ALL the things YOU love.
Donna

Thursday, December 16, 2010

Mexi puff Muffins

adapted from Taste of home


Ingredients

  • 1/2 can  diced tomatoes (14.55 oz can)
  • 1/2 can rotel *your choice of heat, use the mild, hot or extra hot*
  • 2 cups all-purpose flour
  • 3 teaspoons baking powder
  • 1 teaspoon sugar
  • 1 teaspoon red chili powder or flakes
  • 1/2 teaspoon salt
  • 1 egg
  • 1/4 cup butter, melted
  • 1/2 cup shredded Mexi blend cheese 
  • cheese to sprinkle on top (cheddar or your choice) 

Directions:

Drain tomatoes, reserving 1/4 cup liquid. In a bowl, combine the flour, baking powder, sugar, chili and salt. Combine the egg, butter, tomatoes and reserved juice. Stir into dry ingredients just until moistened. Stir in 1/4 cup cheese blend and l tsp of cheddar cheese. 

Fill greased mini  muffin cups two-thirds full. Sprinkle with the remaining cheeses. Bake at 350° for 20-25 minutes or until a toothpick comes out clean. Cool in pan for 5 minutes before removing to a wire rack. Yield servings.

 These are a wonderful snack so give them a try.  They go together very quickly and the family will love them.
Have a wonderful day and remember to Find the time to do all the THINGS you Love.
Donna


Tuesday, December 14, 2010

Gift Box Project

It's that time of year for making goodies to give to all those special people in your life.  My daughter usually makes candy for the holidays but this year she's been a bit behind on things.  SOOOOOOOOOOOOO since I'm not working I took on that project.  I have been making cookies too, and have 10 different types in the freezer, which I will cook next week and then on to giving them all away.  I am making a bunch of different kinds of chocolate candies....some peanut butter cups, chocolate cherries, truffles of many types, mint and peppermint barks, maple nut chocolate (my favorite) and whatever else I can think of.  :-)  It's really nice this year because I don't have to try and do it all in one weekend.  I've been doing the cookie doughs since last week.
Well anyway back to the box.   My friend Patsy had asked me to help her make a box to put some candy kisses in so I made some of those but they are very small and would only hold maybe 4 kisses.  I'll share those and instruction in January.
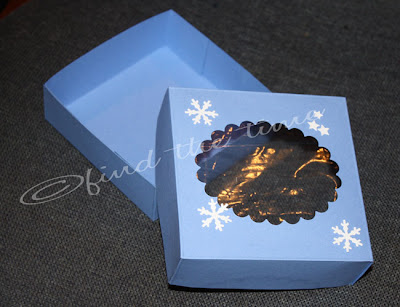
For this box I started with 2-  8.5x11 piece of card stock and cut  one piece to 7.5 x 7.5.  The second piece I just added 1/8 " to two sides. 

I then scored each piece at 1 1/2 inches on all 4 sides. (you can score at any size this makes the depth of the box.   Then cut 2 ends (opposite) to the first score line and you will have this..
 
Tuck the short pieces inside and glue.  This makes your box bottom.
Next if you have a nestabilities die you can use it on the top.  This box top was really to large for the Cuttlebug so this is what I did.
Boy you can see that I really use my machine.  The plate is all smoodged up  but I have a good set of plates when I am just embossing.  ;-)   Then when you take out the nestie you have this.
Now you can cut the sides so you can form the top...but before you do take a piece of clear plastic, I cut a baggie and then glue it to the top on the inside, that will give you the clear window to see inside.  I cut out some snow flakes with another die and wala A Pretty Little Box to put Christmas candy or cookies in.
I made candy yesterday and thought I just put some in the box so you could see.  These are peanut butter cups and apricots dipped in chocolate.  You can get more in but this was just to show you.  The cover on has a bad glare but I'll post it anyway.
Now here it is with some cookies.  The box would fit about 10-12 cookies but I only had four left.  ;-)


Here's a different one I made, this one is oblong, You can make the box any size you want just remember to make the top 1/8 inch bigger on 2 sides.  I made the tag that is on this box.  Just nesties and stickers.  I wrote the to and from with red SU marker.
I need to finishing gluing the sides you can see they are sticking out a bit.
If you look close you can see the measurements in pencil on the bottom of the box.

So there you have it.  Now back to making these for my daughter.  She told me she needs 17 by Thursday night, and I'll be gone most of tomorrow.
Thanks for stopping by, have a wonderful evening and Remember to Find the Time to Do ALL the things YOU love.
Donna

Sunday, December 12, 2010

Chocolate Banana Muffins


These are really yummy and the kids will like them too.   I used the recipe for the moist banana bread and the recipe made 6 large muffins, so guess it would make the 12 regular size ones.  They would be great as a snack, or dessert after a brunch.  I may use these in my Christmas gift plates but make them in the mini muffin tins.

Hope you try these, you won't be disappointed.  Have a wonderful day and Remember to Find the Time to do ALL the things YOU love.
Donna

Wednesday, December 8, 2010

Deluxe Hassleback Potatoes


I tired this recipe with the Oven Lemon Honey chicken, .....Great  accompaniment, the flavors go together wonderfully.  I liked these potatoes but am not sure if I like them MORE than the original.  You try them and let me know.  :-)  I got this recipe from Kayotic Kitchen, here, she has some awesome recipes.

Ingredients:  6 medium potatoes
5 bacon strips
1 tomato
1 large garlic clove
2 tbsp butter
chicken broth
parmesan
dried basil
pepper
salt


Directions:
Cut the bacon slices in 4 and thinly slice the tomatoes. Cut those slices in half.   
Peel and wash the potatoes. Use about  2 potatoes per person.  (If they don't all get eaten you'll have a nice leftover)   Place the potato on a spoon with the flat side down.  Cut the potatoes across at about 1/4 to 1/2 inch intervals. Season the potatoes with salt and pepper. Try to get some between the slices as well.  Alternately put bacon and tomato between the slices.   Sprinkle them with a hint of dried basil. Don't overdo the basil.   In a cast iron skillet or oven proof skillet add  1 1/2 tbsp butter.  Add the garlic before the butter gets really hot. We want to flavor the butter without burning the garlic. Cook for a minute.  Add the potatoes to the skillet.  Pour in enough chicken stock to cover the potatoes between 1/3 to halfway.  Bring the liquid to a boil.  Top the potatoes with the grated Parmesan.   Then put the  skillet to the oven and bake at 350F  for 35 to 40 minutes. Until the potatoes are tender and the cheese is golden brown. The liquid will cook down and the starch will turn it into a thick sauce sticking to the potatoes.
Yet another great side dish to try.
Thanks for stopping by,  have a wonderful day and Remember to Find the Time to Do ALL the things YOU love.
Donna
  

Saturday, December 4, 2010

Homemade Ravioli

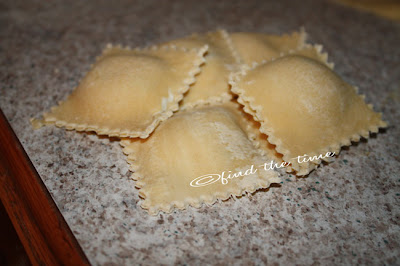
 I got a pasta machine for my birthday, which I really wanted, so of course had to made stuff.  I made some homemade Ravioli, bow ties, fettuccine and soon will make some lasagna.  This was lots of fun and a learned a very import lesson.  If you are not going to cook them right after you make them, freeze them on a cookie sheet until set and then put them in a bag.  If you try to put them in the refridge the get stuck together.  The site I went to said you could do that. .....WRONG.  Lucky for me I took a couple of pictures before I set them in the fridge.  We had a ravioli bake that night..LOL it was yummy so nothing lost.  You could do this recipe even if you don't have a pasta machine but it would be lots of work.  The machine makes it Easy Peasy.  As you can see AJ rolled and cut the fettuccine and did a wonderful job I must say.  In this picture he is finishing up cutting the bow ties so I can shape them.  That's the pasta machine.

Dough Recipe
3 1/2 cups flour
3 eggs
1/4 cup Extra virgin olive oil
pinch of salt
water
I made my dough in the Kitchen Aide, but if you do by hand, put the flour of your work surface and make a well, put the eggs in the well and then break them up while also pulling in flour as you go, add oil and salt when you first get started.  As the dough gets stiffer add a very tiny bit of water at a time.  It's really hard to say how much water to use because so much depends on the weather.  It's its a humid day you will need less, just go slow.  Knead for about 10 minutes until soft and no longer sticky.  Flour well and then wrap in clear wrap and leave to rest for 30 minutes.  I made several batches so I put some in the fridge until I was ready for it.  Be sure to take it out and let rest for 15 minutes or so til it comes back to room temperature.  If it's too cold it's very hard to work with.  Be sure you dough is not sticky, especially if you are using the Pasta machine.
Cheese filling:
  15 oz. of ricotta cheese
 1/4 cup of fresh chopped parsley
1/2 cup of shredded mozzarella cheese
1/2 cup of grated asiago cheese
 1/4 cup of grated parmesan cheese
 1 egg 1/2 tbls. Fresh ground black pepper
 salt to taste

Mix together ricotta, mozzarella, asiago and Parmesan cheeses.  Add parsley and eggs and stir with fork until everything is well blended. Refrigerate until ready to use.


The ravioli maker.
Put rolled dough on top of the left side (one with holes) then put the other piece on and gently push to give the indentations. then fill.

Put some water or egg wash around each one so you can get a good seal.  Turn over and cut.

I used my pie crust fluter , if that's a word.  Worked great.  And the end result.  What do you think??


I just love my new kitchen toy and will probably have pasta once a week now.  ;-)  I'm going to try and make wonton wrappers and egg roll wrappers.  So be on the look out for yet another test.
Thanks for stopping by.  Have a wonderful day and Remember to Find the time to do all the Things YOU love.
Donna

Wednesday, December 1, 2010

Breakfast Anyone?


French Toast...Yum
I usually make white bread at least once a week, sometimes more depending on how much the kids eat.  Josh, my oldest grandson can eat a whole loaf at one sitting.  Well anyway I had bread sitting on the counter and was hungry for this so I made one slice with the white bread and one with the Italian Bread I made the other night .  All I can say is YUM, YUM, YUM.  Whenever I cook the dog comes down to see what there is to eat...too funny.  I like my french toast with sugar and butter, I know most people eat theirs with syrup.
Very easy to make and I'm sure many have made this but sometimes we forget the easy, yummy recipes.

 The white bread slice with butter and sugar.

The Italian bread with butter and sugar.
and a very close up....you can just about taste it, huh?


I used 1 egg, 2 or 3 TBL heavy cream and just a dash of vanilla extract.  (don't use to much vanilla or it will over power the wonderful taste, or you can just omit it)  Dip bread slices in and soak until nice and moist. Heat a skillet add some butter and cook until nice and golden brown on each side.  Remove add butter and your topping....and Enjoy.
Thanks for stopping by, have a wonderful day and Remember to Find the TIME to do ALL the things YOU love.
Donna
Related Posts Plugin for WordPress, Blogger...